How to Rack Up the Likes on That Food Photo
We enlisted Instagram food picture pros to share their top tips.

— -- It seems impossible anymore to scroll through a social media feed without seeing at least one irresistible food photo. But for every delicious-looking shot, there’s also a cringe-worthy wrap or poorly-lit pasta to have to glance at. No double taps for you.
We’re here to save your feeds from sad food shots. We enlisted Instagram food picture pros Andrew Steinthal and Chris Stang to share their top tips for scoring the elusive 100-plus likes. Steinthal and Stang, the co-founders of the food review site Infatuation, regularly score 3,000-plus likes on their Instagram photos, but it hasn’t always been that way. They started out making the same mistakes you probably are, so let’s take a stroll through their feed’s history to see how they worked up to all the digital love – and how you can, too.
Make sure the focus is very clear.
First pick what element of the photo you want to zero in on. “It’s always good to pick something to focus on specifically that is something the eye would be drawn to. If something has a nice big egg in the middle of it,” Steinthal advised.
Once you’ve figured out your subject, know it will take time.
“Patience,” Stang joked, is the key to a very clear photo. “On the newer phones where they have the super shutter function, sometimes that can help because sometimes the phone is still trying to figure out what exactly you’re trying to focus on. So if you just pop off a bunch in a row you have a better chance of catching one that’s actually clear.”
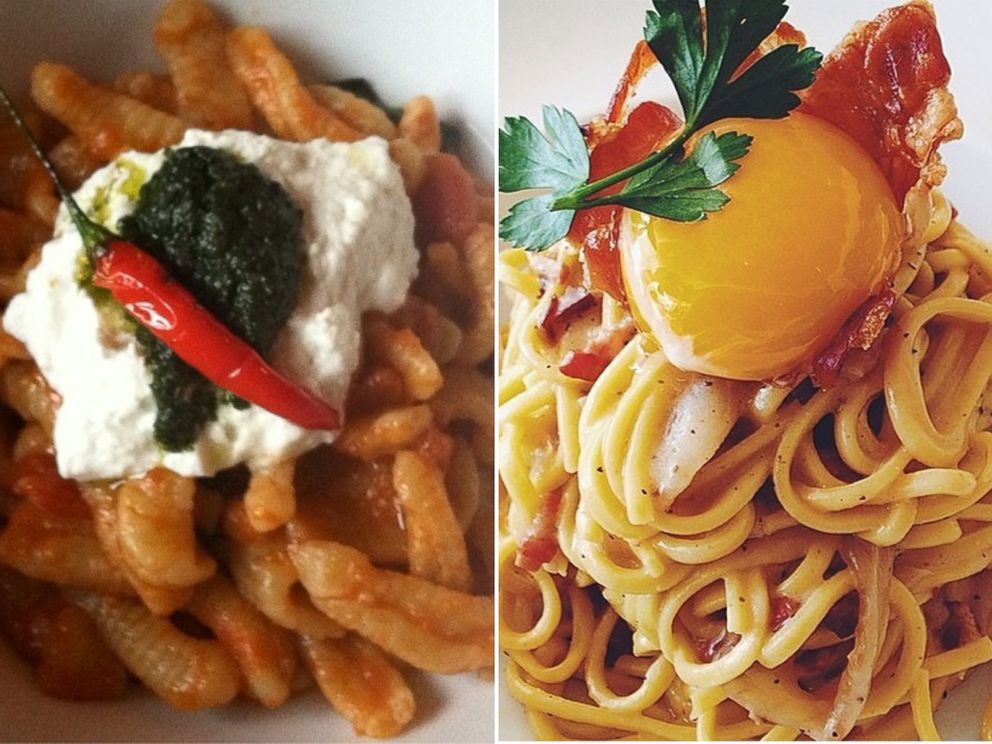
In the first photo, the pasta, despite looking like it could be delicious, is portrayed as lackluster by being out of focus and shadowed. The second pasta, though, is crisp and focuses in on the ready-to-burst egg yolk – making you want to just dive in.
Head outside for better lighting and backdrop.
“The number one tip absolutely is light. Shooting food in restaurants is difficult because it’s rare you actually have really nice light,” Steinthal said. “Everybody wants to put their dinner on Instagram, but the reality is you shouldn’t post really dark, ugly pictures. Because it looks really great in front of you does t mean it’ll look really great in the picture.”
When you're near light, Steinthal said you won't even need a filter.
“You can use them if you're smart and strategic, but don't blow out your photo in crazy neon colors,” he advised. “Your photos are not supposed to look like Ninendo games.”
If you just can’t get yourself near a well-lit spot, though, there are cheats you can try, like using a phone’s flashlight function.
“The flashlight is definitely the better move than the flash. If you can get a friend to do that [hold their phone’s flashlight over your dish as you take its picture], that is absolutey acceptable,” Steinthal said. “Four or five years ago people would look at you like you’re crazy, but now you do it and the table next to you is like, ‘Oh my god, that’s a good idea.’”
That being said, Stang and Steinthal recommend being as quick as possible and respectful of the other diners.
Another quick and easy way to get a ton of light is to simply head outside.
“Something we obviously promote a lot is to take pictures of your food in front of different things, whether it’s on the beach or the skyline in the background,” Steinthal said. “Don’t just take a photo of something on a plate on a gross table. Make it look better by just putting it up in the air or putting it on a ledge or a place that it might normally not be. That way you can focus on the food and have an amazing backdrop that’s a little out of focus but still looks awesome.”
“Rarely is putting the phone sort of at your mouth and shooting at the plate in front of you at a 45 degree angle going to work,” Stang warned, which is what they attempted two years ago with the first plate of oysters.
Instead, shoot at your photos straight down, or what they call the “top-down” approach.
“You have to make sure that your iPhone is flat [parallel to the food],” Steinthal said. “And you have to be really conscious of the shadow – it’s a nemesis. If it’s sunny outside or the light is behind you, you’ll wind up with the shadow of the phone over the food, so stand up, move around the table and get into it like you’re a real photographer. You’ll get a better angle.”
Once you have the best angle, consider what else you can do to make a shot even better. One of Stang and Steinthal’s favorites is adding someone to the shot, like in their second oyster plate picture.
“Coproducing pictures are awesome. The best Instagram shots are set up by different people, like a friend who’s holding something,” Steinthal suggested. “It’s always good to have wingperson helping out.
Add action to your shots.
Food, by nature, is not an interactive subject – but by forcing it to be, you can make for more interesting photos, like in their second ramen shot.
“Action shots are oftentimes a good way to break it up,” Steinthal said. “Everyone likes to photograph a bowl of ramen, but it looks a lot cooler if someone’s actually eating the ramen or it’s wrapped around chopsticks.”

Popular Reads
ABC News Live